Hey there, coffee aficionado! Have you ever found yourself mesmerized by those intricate designs on the surface of your latte? Well, my friend, you’ve stumbled upon the enchanting realm of coffee art. In this blog post, we’re going to dive deep into the mesmerizing world of coffee art, and I’ll show you how you can get started creating your very own coffee masterpieces. So, grab your favorite mug, settle in, and prepare to embark on a journey of artistic caffeination. Let’s get started, shall we?
Master the art of coffee with these bestselling books on coffee art and latte art!


What is Coffee Art?
Coffee art, also known as latte art, is a creative technique of decorating your favorite coffee drinks with intricate and visually appealing designs on the surface. It takes the art of making coffee to a whole new level, turning an ordinary cup of joe into a mesmerizing masterpiece. In this blog section, we’ll delve into the history and significance of coffee art, as well as explore the techniques used to create these stunning designs.


The History of Coffee Art
Coffee art originated in Italy, where it was first introduced in the 1980s. It quickly gained popularity and spread to coffee shops worldwide. The art form evolved from the simple practice of pouring milk into espresso to create patterns, to more complex and intricate designs.
The Significance of Coffee Art
Coffee art not only enhances the aesthetic appeal of your coffee but also adds an extra element of enjoyment to your drinking experience. It showcases the skill and creativity of baristas and adds a personal touch to each cup. It’s no longer just about the taste of the coffee, but also about the visual delight that comes with it.
Techniques Used in Coffee Art
Baristas and artists employ various techniques to create coffee art. Some of the most commonly used techniques include:
- Free Pouring: This technique involves pouring steamed milk into the coffee in a controlled manner, allowing the milk to mix with the espresso and create patterns on the surface.
- Etching: Etching is done by using a tool, such as a toothpick or a latte art pen, to manipulate the surface of the coffee, creating intricate designs.
- Stenciling: Stenciling involves placing a stencil on top of the coffee and dusting it with cocoa powder or cinnamon to create detailed designs.
- Layering: Layering is a technique where different densities of liquid, such as espresso and milk, are carefully poured to create contrasting colors and patterns.
Examples of Coffee Art
To give you a better understanding, here are a few examples of coffee art techniques and designs:
- Rosetta: A common design created by free pouring, resembling a leaf or fern shape.
- Heart: Another popular design created by free pouring, resembling a heart shape.
- Tulip: A more advanced design created by free pouring, resembling a tulip flower.
- Cappuccino Art: This refers to various designs created on top of a classic cappuccino, such as a heart or a rosetta.
- 3D Art: This form of coffee art involves creating three-dimensional designs, often resembling animals or objects, using layering and etching techniques.
Tools and Materials
Are you ready to dive into the world of coffee art? Whether you’re a beginner or already have some experience, having the right tools and materials is essential to create stunning coffee creations. In this blog post, we’ll guide you through the must-have items that you’ll need to get started on your artistic journey. Let’s get brewing!


Espresso Machine
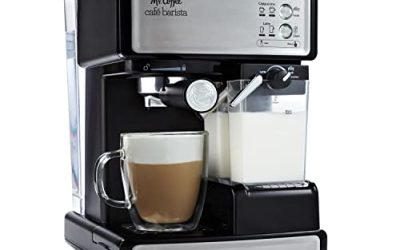
An espresso machine is the heart of any coffee art setup. It’s important to choose a machine that offers consistency, control, and a high-quality extraction. Here are a few popular options to consider:
- Breville Barista Express: This all-in-one machine is perfect for beginners. It has a built-in grinder, precise temperature control, and a steam wand for frothing milk. Plus, it offers customizable settings to suit your preferred brewing style.
- La Marzocco Linea Mini: If you’re serious about your coffee art, the Linea Mini is a top-of-the-line choice. It boasts commercial-grade components, temperature stability, and exceptional steam power. This machine is a favorite among professional baristas.
Remember, the espresso machine you choose should align with your skill level, budget, and specific needs.
Milk Frother
Creating latte art requires perfectly frothed milk, and a milk frother is the key to achieving that velvety texture. Here are two popular options:
- Breville Milk Café: This automatic milk frother is a great choice for beginners. It offers multiple frothing settings, including cappuccino and latte, and can froth both hot and cold milk. It’s easy to use and provides consistent results.
- Miroco Stainless Steel Milk Steamer: If you want to take your frothing skills to the next level, this manual milk steamer is a great option. It allows you to control the frothing process manually, giving you more control over the texture and consistency of the milk.
Coffee Beans
The quality and flavor of your coffee beans play a crucial role in the overall taste of your coffee art. Here are a few popular types of coffee beans to consider:
- Single-Origin: These beans come from a specific region or farm, allowing you to explore unique flavor profiles. For example, Ethiopian Yirgacheffe beans offer fruity and floral notes, while Colombian beans have a rich and nutty flavor.
- Blends: Blends combine beans from different regions to create a well-balanced flavor profile. They are often designed to cater to specific tastes, such as a dark roast blend for a bold and robust flavor or a medium roast blend for a more balanced cup.
Milk
The type of milk you use can greatly impact the texture and taste of your latte art. Here are a few options to consider:
- Whole Milk: Whole milk is commonly used in coffee art due to its higher fat content, which creates a creamy and rich texture. It also provides a sweet and smooth flavor that complements the espresso.
- Oat Milk: For those who prefer a non-dairy alternative, oat milk is a popular choice. It froths well and adds a slightly sweet and nutty flavor to your coffee art.
- Almond Milk: Another dairy-free option, almond milk adds a subtle nutty flavor to your coffee art. It’s important to choose a barista-grade almond milk that froths well and doesn’t separate in the coffee.
Remember to experiment with different milk types to find the one that suits your taste preferences and frothing technique the best.
Additional Tools
In addition to the essentials mentioned above, here are a few more tools that can enhance your coffee art experience:
- Tamper: A tamper is used to evenly distribute and compress the coffee grounds in the portafilter. Look for a tamper that fits the size of your espresso machine’s portafilter.
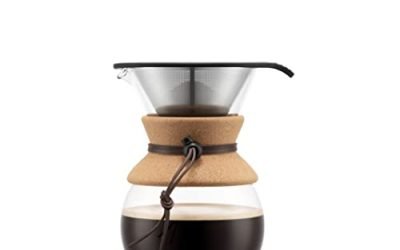
- Pouring Kettle: A pouring kettle with a narrow spout allows for precise control when pouring milk or creating latte art designs.
- Latte Art Pen: A latte art pen is a handy tool for adding intricate details and designs to your coffee creations. It’s like a fine-tipped pen but specifically designed for food-safe use.
Now that you have a better understanding of the essential tools and materials for coffee art, it’s time to gather everything you need and start practicing. Remember, practice makes perfect, so keep experimenting, refining your technique, and most importantly, enjoy the process of creating beautiful coffee art!
Mastering the Basics
Welcome to the world of coffee art! In this blog section, we will guide you through the fundamental techniques that will help you create stunning designs on your coffee drinks. Whether you’re a beginner or looking to refine your skills, mastering the basics is essential to take your coffee art to the next level. So grab your favorite coffee maker, put on your apron, and let’s dive in!
Creating the Perfect Milk Foam
The foundation of any great coffee art lies in the perfect milk foam. Achieving the right texture and consistency can be a game-changer in your creations. Here’s how you can master the art of creating the perfect milk foam:
- Choose the right milk: Different types of milk can yield different foam results. Whole milk is known for its rich texture, while skim milk produces a lighter foam. Experiment with different milk options to find the one that suits your taste preferences.
- Frothing techniques: There are various methods to froth milk, including using a steam wand, handheld frother, or even a French press. Experiment with different techniques and find the one that works best for you.
- Temperature matters: The ideal temperature for milk foam is around 140°F (60°C). Be careful not to overheat the milk as it can affect the taste and texture of the foam.
Pouring and Manipulating the Milk
Once you have mastered the art of creating the perfect milk foam, it’s time to learn how to pour and manipulate the milk to form basic designs. Here are some tips to help you get started:
- Start with the basics: Begin by practicing simple designs like hearts, tulips, and rosettas. These designs serve as the foundation for more intricate patterns.
- Control your pour: Pouring the milk slowly and steadily is key to creating defined shapes. Control the flow by adjusting the height at which you pour the milk into the cup.
- Experiment with contrast: Create contrast in your designs by manipulating the milk foam and the espresso. By adjusting the depth and angle of your pour, you can achieve stunning visual effects.
Exploring Etching Methods
Etching is an advanced technique that can take your coffee art to new heights. It involves using tools like toothpicks or latte art pens to draw intricate designs on the milk foam. Here’s how you can explore different etching methods:
- Start simple: Begin by practicing basic etching techniques such as drawing lines, dots, or simple shapes. As you gain confidence, you can move on to more complex designs.
- Experiment with different tools: Toothpicks, latte art pens, and even skewers can be used to create different effects. Try out different tools to find the one that suits your style.
- Practice, practice, practice: Like any art form, coffee art requires practice. Dedicate time to honing your etching skills, and soon you’ll be able to create intricate designs that will impress everyone.
Remember, mastering the basics takes time and patience. Don’t be discouraged if your first attempts don’t turn out as expected. Keep practicing, experimenting, and refining your techniques. With dedication and a love for coffee, you’ll soon be creating beautiful coffee art that will wow your friends and family.
So go ahead, unleash your creativity, and let your coffee artistry flourish. Happy brewing!
Note: This blog section does not include a conclusion as per the instructions given.
Taking it to the Next Level
So you’ve mastered the basics of coffee art and now you’re ready to take it up a notch. In this blog section, we’ll show you some advanced techniques and tips to help you create intricate and unique designs that will truly impress. Let’s dive in!
Advanced Pouring Techniques
One key aspect of elevating your coffee art skills is mastering advanced pouring techniques. These techniques allow you to create more complex and detailed designs in your latte or cappuccino. Here are a few techniques to try:
- Etching: Etching involves using a fine-tipped tool, like a toothpick or a latte art pen, to draw intricate designs on the surface of your coffee. From hearts and flowers to complex patterns, the possibilities are endless with etching.
- Layering: Layering is all about creating depth and dimension in your designs. By pouring your milk in a slow, controlled manner and varying the height at which you pour, you can create beautiful layers that add visual interest to your latte art.
- Free Pouring: Free pouring is a technique that allows you to create more organic and fluid designs. By mastering your milk pouring technique, you can create shapes like hearts, rosettas, and tulips with ease. Practice makes perfect, so don’t be afraid to experiment and try different patterns.
Experimenting with Flavors and Colors
Another way to elevate your coffee art skills is by experimenting with different flavors and colors. By adding flavored syrups, spices, or even edible glitter to your coffee, you can create visually stunning and delicious creations. Here are a few ideas to get you started:
- Flavored Syrups: Add a pump of vanilla, caramel, or hazelnut syrup to your coffee to not only enhance the taste but also add a pop of color to your latte art.
- Spices: Sprinkle a pinch of cinnamon, cocoa powder, or matcha powder on top of your latte art to create beautiful patterns and add depth to your designs.
- Edible Glitter: For a touch of glamour, dust your latte art with edible glitter. It adds a sparkling effect that will surely impress anyone who sees it.
Tools of the Trade
To truly take your coffee art to the next level, having the right tools is essential. Here are a few recommendations to help you create stunning designs:
- Ninja Coffee Maker XL Pro: This coffee maker comes with a built-in frother that allows you to create perfectly steamed milk for your latte art. It also has a precision pour spout, making it easier to control your milk pouring technique.
- Latte Art Pen Set: Investing in a set of latte art pens will give you precise control over your designs. These pens come with different tip sizes, allowing you to create intricate details with ease.
Wrapping it Up: Tips and Inspiration to Begin Your Coffee Art Journey
In conclusion, coffee art is a wonderful way to express your creativity and add a touch of beauty to your morning routine. By following the tips and techniques shared in this blog post, you can easily get started and create impressive designs. Remember, practice makes perfect, so keep experimenting and refining your skills. With time and dedication, you’ll be able to create stunning coffee art that will impress both yourself and others. So go ahead, grab your favorite mug, brew a delicious cup of coffee, and let your artistic side shine through!


Could you provide more information about the types of tools and materials needed for coffee art?